My Pins

Friday, January 24, 2014

Woodland Stories Inspired Nursery


I have been helping the youngest daughter prepare the nursery these past couple of weeks and she has been inspired from the many books that she enjoyed in her childhood.
She started with some Beatrix Potter fabric; a couple of panels for quilt covers and some metres of a smaller classic print. The plain cotton weave was not ideal for curtaining but instead of using lining fabric etc we sewed them as panels onto some coordinating ready made ring top curtains. This was by far a cheaper option than purchasing the lining and the large eyelet rings and it saved us a lot of sewing.


The nursing chair was given to her by our good friends who re-upholstered and recovered it in coordinating vintage blanketing. You may remember from previous posts they had a business called Resurekt and they did some really funky furniture. A cane chest by the side will store extra blankets and be a handy place to sit a drink when she is feeding in the middle of the night.


It was very easy to coordinate the theme with fresh blue gingham from my stash which edged the quilts and was also made into a cot flounce around the base. We used a gathering stitch to give moderate fullness and sewed a header on top just like a waistband on pants or a skirt. We then used adhesive velcro to attach it to the cot base, making it easily removed for washing.


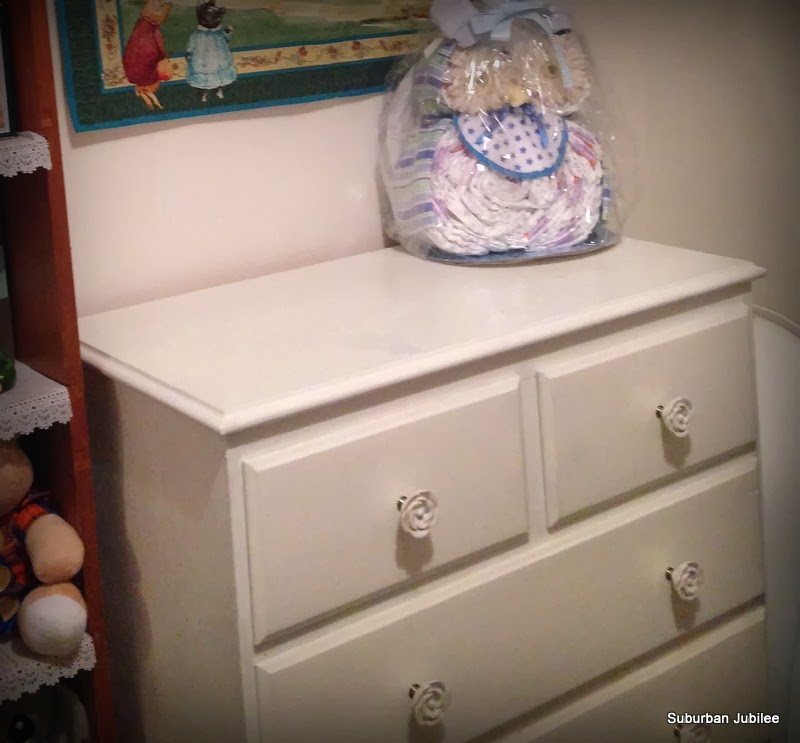
The room is a small single so this existing chest of drawers will hold a change mat on the top as a change table as it is a good height. Changing time supplies will be stored in the top two drawers. It was given a freshen up with white paint and some ceramic rose drawer knobs.


The salvaged shelves were definitely a little worse for wear and even after a thorough scrub still looked a bit sad. We found this lacy runner in a vinyl type material in a haberdashery shop that was sold by the metre and advertised as being "easily wiped down". We bought a couple of metres and by cutting it up the middle we found it fit the shelves beautifully, providing a very frugal and effective renovation of the scratched and worn shelves. Left over paint from the drawers was applied to some op shop frames to house some Hopping Wood greeting cards found at the same shop featuring the art work of Rene Cloke. 


A bargain priced "last on the roll" panel of piggling bland from Beatrix Potter stories was hemmed and turned into a wall hanging.


As was a Foxwood Tales panel from my Villeroy & Boch days of retailing. You may have also noticed some Foxwood Tales tins in the shelves, they'll come in handy for bits and bobs too I'm sure, like cotton balls, buds and teethers. 


The Peter Rabbit panels were edged with blue gingham and backed with the same fabric as the curtains. We were chuffed to find some cosy satin edged blankets at Target in a similar creamy coffee colour that went well with the scheme; even more tickled though to find out at the checkout that they were on quit clearance and priced at just $4 each! We will use motifs left over from the curtains to appliqué onto the blankets.


We are very happy with the results along with a few frugal finds and the treasured gifts from family friends. Our new addition will be surrounded by Beatrix Potter and the tales from Mr Macgregor's Garden, Brambly Hedge, Hopping Wood and Foxwood Tales and of course, some classic Pooh.
I wonder, when this grandson of mine is grown and having children of his own, will books be a thing of the past? Naturally the stories will remain but I do so hope that page turning and hard backs are part of his children's lives too.
For now we enjoy the summer and anticipate the coming of autumn...


Friday, January 17, 2014

Upside Down Plum Cake (Conventional and Thermomix Version)


When plums are in glut this is one of my favourite cakes to make every year. The combination of sweet honey and rosewater marry perfectly with the tart plums. It is an adapted recipe from Vogue Entertaining magazine autumn 2003.

Ingredients
185g butter
400g castor sugar (or regular
sugar if you have a Thermomix)
1 tabs of honey
6 large plums eg blood plums stoned 
and sliced lengthwise into sixths
2 large eggs
2 teas rose water
185g self raising flour
1/2 cup milk

Preheat your oven to 180C


Conventional Method
Put half the butter and half the sugar and honey into a saucepan and stir over a low heat till the butter melts and makes like a sauce with the sugar.
Pour this into the bottom of a 23cm/9" cake tin (preferably not a springform as it may leak during cooking)
place the cut plums on top making an outer circle and then one inside that.
Cream the remaining butter and sugar, add one egg at a time beating well then the rosewater. 
Add the flour and milk alternately and when mixed pour over the plum slices. 
Bake for about an hour till a skewer comes out clean
(pretty standard huh, that's what is good about this cake)
Let it cool for half an hour and the sides tend to shrink away from the tin but if unsure run a knife around before inverting onto a plate.

Thermomix Method
Place half the sugar in the Thermomix and process 3 seconds on speed 9.
Add half the butter and a tab of honey 
1.5 mins, 50C, speed 3
Pour this sauce over the bottom of a 23cm'9" cake tin
arrange plum slices on top as in attractive circles working from the outside in.
No need to wash the Thermomix
Place the remaining sugar in and process to castor as before 
Add the butter and blend 3 secs speed 5-6
Add the eggs, flour, milk and rosewater
Blend on speed 5-6 for 30secs
Pour on top of the plum slices.
Bake for about an hour till a skewer comes out cleanly.
Let it cool for half an hour and the sides tend to shrink away from the tin but if unsure run a knife around before inverting onto a plate.

You must use butter and nothing will substitute or you will have an inferior result, it really is king in this recipe. You could use vanilla essence instead of the rosewater but hey, you bought a bottle of it for that other recipe so you might as well use it up! If you don't have rosewater go and buy some. It's great to have in the cupboard and really turns a milk pudding into a panna cotta. This year I used ginger honey but if you are a leatherwood honey fan you'll enjoy that instead. Oh the combination possibilities!

Wednesday, January 15, 2014

Raised Bed Vs Ground Bed


I can contain myself no longer.
Everyday I read about someone wanting to grow vegetables but they have to wait to save up for the "special raised beds" and then for the soil to fill them. In this instance I am talking about the 12'+ high corrugated iron beds that garden centre and hardware stores are selling in their trendy dozens. On average these cost about $200 each (filled). 
Baloney!
How does an average family afford that.
A raised bed is only essential for people with a disability that prevents them from gardening. There is no reason that anyone else should find it essential to have a raised bed in order to grow vegetables.
There is a massive consumerist movement at the moment trying to convince people that they need to spend a fortune in order to grow food.
In the above photo you will see various building materials that cobble together a containment line. It is something that you can mow and edge too and would be equally practical if you have a mind to gravel paths. It cost nothing.
In fact since this photo we have reverted to no containment lines and just spaded edges.
So lets step through some of the myths.


1."They are perfect for dealing with difficult soil types like clay"
The way to deal with difficult soil types is to improve your soil. Period. If you buy those raised corrugated bedding surrounds, you are going to need a lot of soil bought in just to fill them. If you are looking for an instant start then you may well buy your soil but you don't need an expensive 12" deep bucket to put it in. How about just getting some free stable manure and mixing it with collected leaf matter and green waste. Within a few months you will have something rich starting to happen but that's not the end of your soil work, you have to keep feeding it and replenishing it so make your compost piles on the side as well for topping up. (And if you are tempted to reach for gypsum read here first

2."Raised beds increase the efficiency and yields of crops because the soil is deep, loose and fertile"
It is entirely possible to have the same soil properties in a normal garden bed. It's what gardeners call "tilth" and if you are nurturing your soil (see point 1) then you will realise efficiency and yield. 

3."Raised beds save time and money because you need only dig, water and fertilise the beds not the paths"
Well that goes without saying whether you use a containment line border or a spaded edge.

4."You don't need to weed as much as plants grown close together lessen weed competition"
This is based on the premise that container gardening is intensive gardening in that you are cramming in plants in a limited space for maximum yield. I would argue that is the case for any backyard grower. Unlike big farms and mono cropping concerns we are trying to harvest a bit of everything so the very nature of how we grow is intensive. We have the luxury of constantly top-dressing soils with compost, pea straw, manure so as we take the goodness in harvest we keep replenishing. Growing crops and different vegetable types close together like this is possible in conventional non-raised beds too.

The Cons
Here are some reasons not to go spending hundreds of dollars on raised beds.

1. Flexibility 
Having conventionally dug garden beds means you can change their location from year to year and change their size to adapt for household needs. This year you might want to have a large corn crop but next year you might be wanting to devote more space to herbs. If you buy pre-fabbed tubs for raised beds then you are pretty much locked into their size and shape and where they will sit. As your family needs change so too does your garden. As children grow you might put in a sand pit and a cubby house but a few years on these give way to trampoline and a basketball hoop. Your dug garden can conform, wrap, skirt and re-locate much more easily than fixed sized beds.

2. Watering
Raised container growing means more watering. There is more water loss generally due to the extra drainage created within the beds.

3. Harvesting
Harvesting and removing crops like broad beans and corn is much easier with a garden fork and some boot grunt. There are times that you just need to get in and fork it over which is pretty hard when you are trying not to damage bed edges or break seams.

4. Temperature Control
The raised bedding system is advantageous in the early spring when it raises soil temperatures but it must surely be harder on the plants in the height of summer. With a conventionally dug bed. thick dense mulching keeps the soil temperatures even and prevents moisture loss.


The Pros
Here are some reasons why you would choose raised bedding

1 Accessibility
For someone with back problems or for older people with agility loss a raised bed system is a great solution, particularly if they are built with narrow edges for sitting while digging but these beds would need to be narrow and limiting in the types of crops. 

2. Aesthetics
Some people see gardening as a bit messy, especially vegetable gardens. They prefer to have something more pleasing to the eye like neat conformity and if that is your taste then these raised beds are a very conforming neat way to go.

3. Temporary
If you are renting or in a retirement villa you may not want to radically change the structure of the yard so a raised bed may be the ideal solution if you are planning to grow for only a year or two before needing to dismantle and move on.

4. Secured
This would deter some dogs from trampling and digging but still wouldn't be out of reach of chickens (heh heh)

If you really want to grow vegetables and you live in ordinary suburbia, you don't have to spend a fortune. Just go into your yard, front or back or side, and turn over a sod. It starts there and costs nothing.


If you think you need raised beds for growing, make a list of the reasons why, weigh that up against the cost and then reassess and make sure it's not because the consumer market told you that you need them or because you saw other people do it that way. There is a big ground swell and movement back to basics but the retailers need you to keep buying so they are going to try to sell ice to Eskimos. Save your money.

And now over to you with comments,
Discuss....

Sunday, January 12, 2014

Heritage Salad


There are a number of reasons to grow heritage vegetables; great for seed saving, climate/location specific, variety of flavour, colour and keeping/storing properties.
At the moment we are eating really interesting and tempting salads with heritage cut lettuce as the base. We are growing varieties like; Drunken Lady, Prize Head and Lollo Bionda. The contrasting colour of their leaves looks exciting and appetising and they taste buttery and fresh.
The season has been slow here and we have just started to harvest our broad beans. The potatoes are all self sown from plantings years ago and we enjoy a variety, our favourite for salads being Blue Sapphire. Not good for mashing as it looks like blueberry porridge but looks sensational very lightly boiled and cut into chunks for your salads. Add some cooked beetroot chunks too, a dollop of natural yoghurt and a top sprinkling of walnuts or pumpkin seeds.
When you can eat fresh from the garden and enjoy so much variety I'm afraid going out to dinner fails to live up to expectations for us 9 times out of 10.
Go on, DIY and PYO!


Wednesday, January 8, 2014

Where I Hang My Hat


You remember last year we visited the wilderness of the World Heritage listed area on the west coast (post here). While in Strahan we bought some Huon pine blocks, wood shavings and a couple of plank pieces. For the rest of our journey they filled the car with their rich heady smell. 

I have used the shavings as a natural insect repellent in the hens nesting boxes and also in wardrobe sachets to protect our clothing and linens. Some of the blocks we gifted to a wood working friend and here as you can see, is what we intended the rough cut planks for.


Over the years we have collected hooks, knobs and all sorts of bits and bobs. You never know when something is going to come in handy and I can't bring myself to just throw things on the scrap heap especially when I think about it's provenance. 


Somebody kissed their wife goodbye one morning back in 1880 and went to the foundry and spent a cold winters day making the small ornate window furniture. He cast it and then it was mounted onto the fixing plate with a sturdy hinge. A builder sourced it from the foundry and fitted it to a little home in South Launceston where it hung quietly for 100 years watching generations come and go and renovations all around periodically. In those days it hung up the other way, the hinge allowing it to fall flat and snug against the window until someone inserted their forefinger into the perfectly shaped and fashioned groove under the furled leaf shape to lift the window.During one of those renovations it was finally removed and for 30 years it sat heavy, dull and dirty in a box till it found it's rightful place to shine again.


Do I wax to lyrical, do I place too much importance? I don't know, just seems to me that in a world where giant behemoths of trucks scoop tonnes of ore from the ground in a single swipe and hundreds of door handles are cheaply cast in their thousands that we should do some homage to sweat, toil and craftsmanship of yesteryear because we are in danger of becoming very blasé and casual and it is this state of mind that allows us to become the "throw away society"


The timber has been simply coated with bees wax to bring out the golden honey colour. The assorted fittings were polished and buffed and appreciated for their unique qualities. It's not everyone's style and it's a bit "rustic" but to me it tells a thousand stories and memories of our holiday is just one of them....


Monday, January 6, 2014

Hydrating, Saturating and De-hydrating


Actually it is more than just re-hydration of the beans. I'm following the theory and method from the Nourishing Traditions book. I'm soaking the beans which contain phytic acid and enzyme inhibitors in order to deactivate these properties and avoid digestive stress and allow protein assimilation and absorption. The beans are so inexpensive and nutritionally packed but they do need to be processed properly. I know some books don't even suggest soaking the beans and certainly the cooking time is usual given as "till tender". According to the Nourishing Traditions book it is suggested the beans are soaked for 12-24 hours and some in acidulated water (lemon juice or whey) and then simmered for 4-8 hours.


Here is a high definition photo of the beans soaking showing them covered in tiny air bubbles. (Looks similar to the pencil drawing of Richard Klekociuk) I've tried eating dried beans without soaking and simmered till tender and although they are certainly edible, the stomach "discomfort" and "wind" is not pleasant. I tend to soak the beans and then cook them for several hours in a slow cooker as part of a meat casserole. In summer after a good long simmer, I rinse and refrigerate and use in salads.


I'm also dehydrating. Can you guess what they are?
Blackcurrants.
These currants are so tart not even the birds touch them (well almost never) but they are full of pectin which makes them great to mix with other berries and fruit that may be low in pectin required for jam and jelly setting (more about pectin here). They are rich in vitamins and anti-oxidants and also make delicious cordial but instead of making cordial this year with them I have decided to dehydrate them.
While they are fresh and plump and round, just one can make your lips purse tight and your cheeks contract hard over the teeth but when dehydrated they seem to concentrate their flavour and though still "tangy" they are quite delicious and incredibly tasty in a pumpkin and cous cous or quinoa salad with some mint and maybe a honey/chilli dressing. These could also be used in place of the dried currants in the Beetroot and Carrot Salad with Pomegranate Dressing 
All very good reasons to include easy growing black currant bushes in your garden.


Can you guess what these are? They are not marshmallows...
The long white radish.
I'm pickling these in a natural fermentation method same as we did for the beetroot (in this post) and cucumbers (this post here).
In the one on the right I have also added a modest amount of my home grown caraway seeds. Lee from Killiecrankie Farm Nursery has warned me that growing and using your own caraway is much more potent than the shop bought seeds so I am being conservative with the amounts.
After a couple of weeks saturating in the brine fermentation should be complete and my mouth is watering just thinking about it.

So we are still keeping busy waiting for summer to arrive in Tasmania and filling in the days before the tomato glut processing. 
What are you preserving at the moment?


Thursday, January 2, 2014

Elegant Sufficiency - Manners In A Modern World


Time to pack up and embrace the new year with most of the formal parties behind us it is now a season for casual summertime enjoyments, BBQs, river picnics, Shakespeare in the Gardens and Symphony Under the Stars.
Whether your entertaining/invitations are formal or informal the rules of manners still apply. If you are sent an invitation your RSVP should be in kind. For example, if you receive an invitation in the mail even if a phone number is provided for contact, it is still preferable to mail a reply. If you receive a facebook event invite then it is quite OK to reply using that means. 
BUT
reply you must
promptly, either in the negative or the affirmative with thanks for the invitation.
Do NOT hang out waiting to see if there is a better offer you would rather commit to
Do NOT not reply and then turn up
and do NOT affirm and then not show without an exceptionally good reason.


Naturally being prompt and punctual are a given but just as importantly is not over-staying your welcome. If invitations have a start and finish time then that is your guide. If the invitation is less specific and is for lunch say, then generally about an hour after the meal is finished is time to take your leave.
I couldn't put it any better than Provocative Manners in their post "Overstaying Your Welcome" "it is never appropriate to hang around till dinner.  RUDE!"  a short take on guidelines and what to look for.


There is never an appropriate time to be loud and inelegant. If you are enjoying a couple of drinks, then do exactly that, never pass the point where you become a nuisance to guests and an embarrassment for the hostess.
At table in this day and age, passing around a phone device to show pictures is acceptable as long as it is inclusive and not during the meal. What is NOT acceptable is using devices to check facebook status updates or messages. If you really are expecting a life or death message then absent yourself from the table and deal with it away from guests and in another room. Taking a call at the table and talking loudly is also a no-no.


I still believe written thank you cards are also a must after any formal party where the hostess has gone to extraordinary measures to provide a beautiful meal and entertainment.

Many of us are already in touch with these manners but are we forgetting to pass them onto our children and are we failing to expect our nearest and dearest to live up to them as well?
I have a favourite quote:

"Good manners are not artifice and hypocrisy but the oil that lubricates society, the small rules that regulate our behaviour and negate the need for more laws which curtail our freedom" 
June Daly-Watkins

How did your festive season go? Did you experience any ill-mannered behaviours? Are we getting complacent? Do you find modern technology creeping into entertainment circles and how do you see the lines drawn?


Related Posts Plugin for WordPress, Blogger...